Temporal Client - Java SDK
A Temporal Client enables you to communicate with the Temporal Service. Communication with a Temporal Service lets you perform actions such as starting Workflow Executions, sending Signals to Workflow Executions, sending Queries to Workflow Executions, getting the results of a Workflow Execution, and providing Activity Task Tokens.
This page shows you how to do the following using the Java SDK with the Temporal Client:
- Connect to a local development Temporal Service
- Connect to Temporal Cloud
- Start a Workflow Execution
- Get Workflow results
A Temporal Client cannot be initialized and used inside a Workflow. However, it is acceptable and common to use a Temporal Client inside an Activity to communicate with a Temporal Service.
Connect to a development Temporal Service
Use the newLocalServiceStubs method to create a stub that points to the Temporal development service, and then use the WorkflowClient.newInstance method to create a Temporal Client.
sample-apps/java/client/devserver-client-sample/src/main/java/clientsample/YourCallerApp.java
// ...
        // Create an instance that connects to a Temporal Service running on the local
        // machine, using the default port (7233)
        WorkflowServiceStubs serviceStub = WorkflowServiceStubs.newLocalServiceStubs();

        // Initialize the Temporal Client
        // This application uses the Client to communicate with the local Temporal Service
        WorkflowClient client = WorkflowClient.newInstance(serviceStub);
When you create a new Client with an instance of newLocalServiceStubs, the Client connects to the default local port at port 7233. When you don't specify a custom Namespace, the Client connects to the default Namespace.
To connect to a custom Namespace, use the WorkflowClientOptions.Builder.setNamespace method to set the Namespace. Then pass the clientOptions to the WorkflowClient.newInstance method.
- Configuration File
- Environment Variables
- Code
You can use a TOML configuration file to set connection options for the Temporal Client. The configuration file lets you
configure multiple profiles, each with its own set of connection options. You can then specify which profile to use when
creating the Temporal Client. You can use the environment variable TEMPORAL_CONFIG_FILE to specify the location of the
TOML file or provide the path to the file directly in code. If you don't provide the configuration file path, the SDK
looks for it at the path ~/.config/temporalio/temporal.toml. For a list of all available configuration options, refer
to Environment Configuration
The connection options set in configuration files have lower precedence than environment variables. This means that if you set the same option in both the configuration file and as an environment variable, the environment variable value overrides the option set in the configuration file.
For example, the following TOML configuration file defines two profiles: default and prod. Each profile has its own
set of connection options.
# Default profile for local development
[profile.default]
address = "localhost:7233"
namespace = "default"

# Custom gRPC headers
[profile.default.grpc_meta]
my-custom-header = "development-value"
trace-id = "dev-trace-123"

# Production profile for Temporal Cloud
[profile.prod]
address = "your-namespace.a1b2c.tmprl.cloud:7233"
namespace = "your-namespace"
api_key = "your-api-key-here"

# TLS configuration for production
[profile.prod.tls]
# TLS is auto-enabled when this TLS config or API key is present, but you can configure it explicitly
# disabled = false
# Use certificate files for mTLS
client_cert_path = "/etc/temporal/certs/client.pem"
client_key_path = "/etc/temporal/certs/client.key"

# Custom headers for production
[profile.prod.grpc_meta]
environment = "production"
service-version = "v1.2.3"
You can create a Temporal Client using a specific profile from the configuration file as follows. First use ClientConfigProfile.load to load the profile from the configuration file. Then use profile.toWorkflowServiceStubsOptions and profile.toWorkflowClientOptions to convert the profile to WorkflowServiceStubsOptions and WorkflowClientOptions respectively. Then use WorkflowClient.newInstance to create a Temporal Client.
import io.temporal.client.WorkflowClient;
import io.temporal.client.WorkflowClientOptions;
import io.temporal.envconfig.ClientConfigProfile;
import io.temporal.envconfig.LoadClientConfigProfileOptions;
import io.temporal.serviceclient.WorkflowServiceStubs;
import io.temporal.serviceclient.WorkflowServiceStubsOptions;
import java.nio.file.Paths;
import org.slf4j.Logger;
import org.slf4j.LoggerFactory;

public class LoadFromFile {

  private static final Logger logger = LoggerFactory.getLogger(LoadFromFile.class);

  public static void main(String[] args) {
    try {

      String configFilePath =
          Paths.get(LoadFromFile.class.getResource("/config.toml").toURI()).toString();

      ClientConfigProfile profile =
          ClientConfigProfile.load(
              LoadClientConfigProfileOptions.newBuilder()
                  .setConfigFilePath(configFilePath)
                  .build());

      WorkflowServiceStubsOptions serviceStubsOptions = profile.toWorkflowServiceStubsOptions();
      WorkflowClientOptions clientOptions = profile.toWorkflowClientOptions();

      try {
        // Create the workflow client using the loaded configuration
        WorkflowClient client =
            WorkflowClient.newInstance(
                WorkflowServiceStubs.newServiceStubs(serviceStubsOptions), clientOptions);

        // Test the connection by getting system info
        var systemInfo =
            client
                .getWorkflowServiceStubs()
                .blockingStub()
                .getSystemInfo(
                    io.temporal.api.workflowservice.v1.GetSystemInfoRequest.getDefaultInstance());

        logger.info("✅ Client connected successfully!");
        logger.info("   Server version: {}", systemInfo.getServerVersion());

      } catch (Exception e) {
        logger.error("❌ Failed to connect: {}", e.getMessage());
      }

    } catch (Exception e) {
      logger.error("Failed to load configuration: {}", e.getMessage(), e);
      System.exit(1);
    }
  }
}
Use the envconfig package to set connection options for the Temporal Client using environment variables. For a list of
all available environment variables and their default values, refer to
Environment Configuration.
For example, the following code snippet loads all environment variables and creates a Temporal Client with the options
specified in those variables. If you have defined a configuration file at either the default location
(~/.config/temporalio/temporal.toml) or a custom location specified by the TEMPORAL_CONFIG_FILE environment
variable, this will also load the default profile in the configuration file. However, any options set via environment
variables will take precedence.
import io.temporal.client.WorkflowClient;
import io.temporal.client.WorkflowClientOptions;
import io.temporal.envconfig.ClientConfigProfile;
import io.temporal.envconfig.LoadClientConfigProfileOptions;
import io.temporal.serviceclient.WorkflowServiceStubs;
import io.temporal.serviceclient.WorkflowServiceStubsOptions;
import java.nio.file.Paths;
import org.slf4j.Logger;
import org.slf4j.LoggerFactory;

public class LoadFromFile {

  private static final Logger logger = LoggerFactory.getLogger(LoadFromFile.class);

  public static void main(String[] args) {
    try {

      ClientConfigProfile profile =
          ClientConfigProfile.load(LoadClientConfigProfileOptions.newBuilder().build());

      WorkflowServiceStubsOptions serviceStubsOptions = profile.toWorkflowServiceStubsOptions();
      WorkflowClientOptions clientOptions = profile.toWorkflowClientOptions();

      try {
        // Create the workflow client using the loaded configuration
        WorkflowClient client =
            WorkflowClient.newInstance(
                WorkflowServiceStubs.newServiceStubs(serviceStubsOptions), clientOptions);

        // Test the connection by getting system info
        var systemInfo =
            client
                .getWorkflowServiceStubs()
                .blockingStub()
                .getSystemInfo(
                    io.temporal.api.workflowservice.v1.GetSystemInfoRequest.getDefaultInstance());

        logger.info("✅ Client connected successfully!");
        logger.info("   Server version: {}", systemInfo.getServerVersion());

      } catch (Exception e) {
        logger.error("❌ Failed to connect: {}", e.getMessage());
      }

    } catch (Exception e) {
      logger.error("Failed to load configuration: {}", e.getMessage(), e);
      System.exit(1);
    }
  }
}
If you don't want to use environment variables or a configuration file, you can specify connection options directly in code. This is convenient for local development and testing. You can also load a base configuration from environment variables or a configuration file, and then override specific options in code.
// ...
        // Add the Namespace as a Client Option
        WorkflowClientOptions clientOptions = WorkflowClientOptions
            .newBuilder()
            .setNamespace(namespace)
            .build();

        // Initialize the Temporal Client
        // This application uses the Client to communicate with the Temporal Service
        WorkflowClient client = WorkflowClient.newInstance(service, clientOptions);
Connect to Temporal Cloud
You can connect to Temporal Cloud using either an API key or through mTLS. Connection to Temporal Cloud or any secured Temporal Service requires additional connection options compared to connecting to an unsecured local development instance:
- Your credentials for authentication.
- If you are using an API key, provide the API key value.
- If you are using mTLS, provide the mTLS CA certificate and mTLS private key.
- Your Namespace and Account ID combination, which follows the format
<namespace_id>.<account_id>. - The endpoint may vary. The most common endpoint used is the gRPC regional endpoint, which follows the format:
<region>.<cloud_provider>.api.temporal.io:7233. - For Namespaces with High Availability features with API key authentication enabled, use the gRPC Namespace endpoint:
<namespace>.<account>.tmprl.cloud:7233. This allows automated failover without needing to switch endpoints.
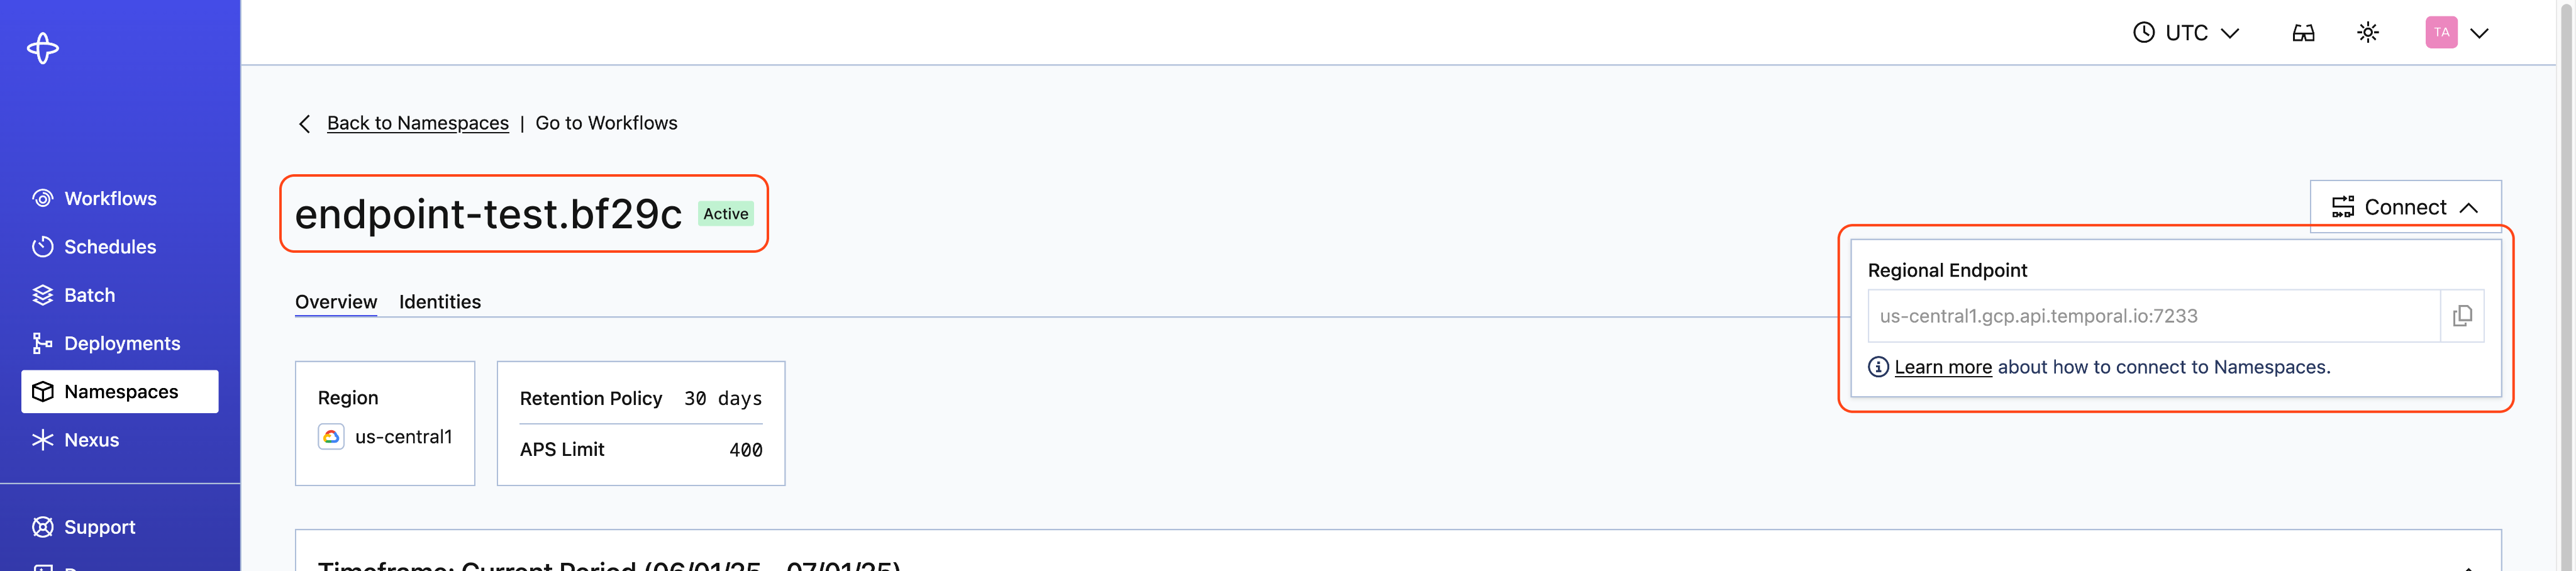
You can find the Namespace and Account ID, as well as the endpoint, on the Namespaces tab:
You can provide these connection options using environment variables, a configuration file, or directly in code.
- Configuration File
- Environment Variables
- Code
You can use a TOML configuration file to set connection options for the Temporal Client. The configuration file lets you configure multiple profiles, each with its own set of connection options. You can then specify which profile to use when creating the Temporal Client. For a list of all available configuration options you can set in the TOML file, refer to Environment Configuration.
You can use the environment variable TEMPORAL_CONFIG_FILE to specify the location of the TOML file or provide the path
to the file directly in code. If you don't provide the path to the configuration file, the SDK looks for it at the
default path ~/.config/temporalio/temporal.toml.
The connection options set in configuration files have lower precedence than environment variables. This means that if you set the same option in both the configuration file and as an environment variable, the environment variable value overrides the option set in the configuration file.
For example, the following TOML configuration file defines a cloud profile with the necessary connection options to
connect to Temporal Cloud via an API key:
# Cloud profile for Temporal Cloud
[profile.cloud]
address = "your-namespace.a1b2c.tmprl.cloud:7233"
namespace = "your-namespace"
api_key = "your-api-key-here"
If you want to use mTLS authentication instead of an API key, replace the api_key field with your mTLS certificate and
private key:
# Cloud profile for Temporal Cloud
[profile.cloud]
address = "your-namespace.a1b2c.tmprl.cloud:7233"
namespace = "your-namespace"
tls_client_cert_data = "your-tls-client-cert-data"
tls_client_key_path = "your-tls-client-key-path"
With the connections options defined in the configuration file, use the LoadClientOptions function in the envconfig
package to create a Temporal Client using the cloud profile as follows. After loading the profile, you can also programmatically override specific connection options before creating the client.
import io.temporal.client.WorkflowClient;
import io.temporal.client.WorkflowClientOptions;
import io.temporal.envconfig.ClientConfigProfile;
import io.temporal.envconfig.LoadClientConfigProfileOptions;
import io.temporal.serviceclient.WorkflowServiceStubs;
import io.temporal.serviceclient.WorkflowServiceStubsOptions;
import java.nio.file.Paths;
import org.slf4j.Logger;
import org.slf4j.LoggerFactory;

public class LoadProfile {

  private static final Logger logger = LoggerFactory.getLogger(LoadProfile.class);

  public static void main(String[] args) {
    String profileName = "cloud";

    try {
      String configFilePath =
          Paths.get(LoadProfile.class.getResource("/config.toml").toURI()).toString();

      logger.info("--- Loading '{}' profile from {} ---", profileName, configFilePath);

      // Load specific profile from file with environment variable overrides
      ClientConfigProfile profile =
          ClientConfigProfile.load(
              LoadClientConfigProfileOptions.newBuilder()
                  .setConfigFilePath(configFilePath)
                  .setConfigFileProfile(profileName)
                  .build());

      // Demonstrate programmatic override - fix the incorrect address from staging profile
      ClientConfigProfile.Builder profileBuilder = profile.toBuilder();
      profileBuilder.setAddress("localhost:7233"); // Override the incorrect address
      profile = profileBuilder.build();

      WorkflowServiceStubsOptions serviceStubsOptions = profile.toWorkflowServiceStubsOptions();
      WorkflowClientOptions clientOptions = profile.toWorkflowClientOptions();

      try {
        // Create the workflow client using the loaded configuration
        WorkflowClient client =
            WorkflowClient.newInstance(
                WorkflowServiceStubs.newServiceStubs(serviceStubsOptions), clientOptions);

        // Test the connection by getting system info
        var systemInfo =
            client
                .getWorkflowServiceStubs()
                .blockingStub()
                .getSystemInfo(
                    io.temporal.api.workflowservice.v1.GetSystemInfoRequest.getDefaultInstance());

        logger.info("✅ Client connected successfully!");
        logger.info("   Server version: {}", systemInfo.getServerVersion());

      } catch (Exception e) {
        logger.error("❌ Failed to connect: {}", e.getMessage());
      }

    } catch (Exception e) {
      logger.error("Failed to load configuration: {}", e.getMessage(), e);
      System.exit(1);
    }
  }
}
The following environment variables are required to connect to Temporal Cloud:
TEMPORAL_NAMESPACE: Your Namespace and Account ID combination in the format<namespace_id>.<account_id>.TEMPORAL_ADDRESS: The gRPC endpoint for your Temporal Cloud Namespace.TEMPORAL_API_KEY: Your API key value. Required if you are using API key authentication.TEMPORAL_TLS_CLIENT_CERT_DATAorTEMPORAL_TLS_CLIENT_CERT_PATH: Your mTLS client certificate data or file path. Required if you are using mTLS authentication.TEMPORAL_TLS_CLIENT_KEY_DATAorTEMPORAL_TLS_CLIENT_KEY_PATH: Your mTLS client private key data or file path. Required if you are using mTLS authentication.
Ensure these environment variables exist in your environment before running your Java application.
Import the envconfig package to set connection options for the Temporal Client using environment variables. The
MustLoadDefaultClientOptions function will automatically load all environment variables. For a list of all available
environment variables and their default values, refer to Environment Configuration.
For example, the following code snippet loads all environment variables and creates a Temporal Client with the options
specified in those variables. If you have defined a configuration file at either the default location
(~/.config/temporalio/temporal.toml) or a custom location specified by the TEMPORAL_CONFIG_FILE environment
variable, this will also load the default profile in the configuration file. However, any options set via environment
variables will take precedence.
import io.temporal.client.WorkflowClientOptions;
import io.temporal.envconfig.ClientConfigProfile;
import io.temporal.envconfig.LoadClientConfigProfileOptions;
import io.temporal.serviceclient.WorkflowServiceStubs;
import io.temporal.serviceclient.WorkflowServiceStubsOptions;
import java.nio.file.Paths;
import org.slf4j.Logger;
import org.slf4j.LoggerFactory;

public class LoadFromFile {

  private static final Logger logger = LoggerFactory.getLogger(LoadFromFile.class);

  public static void main(String[] args) {
    try {

      ClientConfigProfile profile =
          ClientConfigProfile.load(LoadClientConfigProfileOptions.newBuilder().build());

      WorkflowServiceStubsOptions serviceStubsOptions = profile.toWorkflowServiceStubsOptions();
      WorkflowClientOptions clientOptions = profile.toWorkflowClientOptions();

      try {
        // Create the workflow client using the loaded configuration
        WorkflowClient client =
            WorkflowClient.newInstance(
                WorkflowServiceStubs.newServiceStubs(serviceStubsOptions), clientOptions);

        // Test the connection by getting system info
        var systemInfo =
            client
                .getWorkflowServiceStubs()
                .blockingStub()
                .getSystemInfo(
                    io.temporal.api.workflowservice.v1.GetSystemInfoRequest.getDefaultInstance());

        logger.info("✅ Client connected successfully!");
        logger.info("   Server version: {}", systemInfo.getServerVersion());

      } catch (Exception e) {
        logger.error("❌ Failed to connect: {}", e.getMessage());
      }

    } catch (Exception e) {
      logger.error("Failed to load configuration: {}", e.getMessage(), e);
      System.exit(1);
    }
  }
}
Now, when instantiating a Temporal client in your Temporal Java SDK code, provide the API key with WorkflowServiceStubsOptions and the Namespace and Account ID in WorkflowClient.newInstance:
    WorkflowServiceStubs service =
        WorkflowServiceStubs.newServiceStubs(
            WorkflowServiceStubsOptions.newBuilder()
                .addApiKey(
                    () ->
                        <API key>)
                .setTarget(<endpoint>)
                .setEnableHttps(true)
                ...
                .build());

    WorkflowClient client =
        WorkflowClient.newInstance(
            service, WorkflowClientOptions.newBuilder().setNamespace(<namespace_id>.<account_id>).build());
To update the API key, update the stubOptions:
String myKey = <APIKey>;
WorkflowServiceStubsOptions stubOptions =
    WorkflowServiceStubsOptions.newBuilder()
        .addApiKey(() -> myKey)
        .build();
// Update by replacing, this must be done in a thread safe way
myKey = "Bearer " + <new APIKey>;
To connect to Temporal Cloud using mTLS, you need to provide the mTLS CA certificate and mTLS private key. You can then use the SimpleSslContextBuilder to build an SSL context. Then use the WorkflowServiceStubsOptions.Builder.setSslContext method to set the SSL context.
When you use a remote service, you don't use the newLocalServicesStubs convenience method.
Instead, set your connection details as stub configuration options:
sample-apps/java/client/cloudserver-client-sample/src/main/java/clientsample/YourCallerApp.java
// ...
            // Set the Service Stub options (SSL context and gRPC endpoint)
            WorkflowServiceStubsOptions stubsOptions = WorkflowServiceStubsOptions
                .newBuilder()
                .setSslContext(sslContext)
                .setTarget(gRPCEndpoint)
                .build();

             // Create a stub that accesses a Temporal Service
            WorkflowServiceStubs serviceStub = WorkflowServiceStubs.newServiceStubs(stubsOptions);
Each Temporal Cloud service Client has four prerequisites.
- The full Namespace Id from the Cloud Namespace details page
- The gRPC endpoint from the Cloud Namespace details page
- Your mTLS private key
- Your mTLS x509 Certificate
Retrieve these values before building your Client.
The following sample generates an SSL context from the mTLS .pem and .key files. Along with the gRPC endpoint, this information configures a service stub for Temporal Cloud. Add the Namespace to your Client build options and initialize the new Client:
sample-apps/java/client/cloudserver-client-sample/src/main/java/clientsample/YourCallerApp.java
// ...
            // Generate an SSL context
            InputStream clientCertInputStream = new FileInputStream(clientCertPath);
            InputStream clientKeyInputStream = new FileInputStream(clientKeyPath);
            SslContext sslContext = SimpleSslContextBuilder.forPKCS8(clientCertInputStream, clientKeyInputStream).build();

            // Set the Service Stub options (SSL context and gRPC endpoint)
            WorkflowServiceStubsOptions stubsOptions = WorkflowServiceStubsOptions
                .newBuilder()
                .setSslContext(sslContext)
                .setTarget(gRPCEndpoint)
                .build();

             // Create a stub that accesses a Temporal Service
            WorkflowServiceStubs serviceStub = WorkflowServiceStubs.newServiceStubs(stubsOptions);

            // Set the Client options
            WorkflowClientOptions clientOptions = WorkflowClientOptions
                .newBuilder()
                .setNamespace(namespace)
                .build();

            // Initialize the Temporal Client
            // This application uses the Client to communicate with the Temporal Service
            WorkflowClient client = WorkflowClient.newInstance(serviceStub, clientOptions);
Start a Workflow Execution
How to start a Workflow Execution using the Java SDK
Workflow Execution semantics rely on several parameters—that is, to start a Workflow Execution you must supply a Task Queue that will be used for the Tasks (one that a Worker is polling), the Workflow Type, language-specific contextual data, and Workflow Function parameters.
In the examples below, all Workflow Executions are started using a Temporal Client. To spawn Workflow Executions from within another Workflow Execution, use either the Child Workflow or External Workflow APIs.
See the Customize Workflow Type section to see how to customize the name of the Workflow Type.
A request to spawn a Workflow Execution causes the Temporal Service to create the first Event (WorkflowExecutionStarted) in the Workflow Execution Event History. The Temporal Service then creates the first Workflow Task, resulting in the first WorkflowTaskScheduled Event.
Use WorkflowStub to start a Workflow Execution from within a Client, and ExternalWorkflowStub to start a different Workflow Execution from within a Workflow.
See SignalwithStart to start a Workflow Execution to receive a Signal from within another Workflow.
Using WorkflowStub
WorkflowStub is a proxy generated by the WorkflowClient.
Each time a new Workflow Execution is started, an instance of the Workflow implementation object is created.
Then, one of the methods (depending on the Workflow Type of the instance) annotated with @WorkflowMethod can be invoked.
As soon as this method returns, the Workflow Execution is considered to be complete.
You can use a typed or untyped WorkflowStub in the client code.
- Typed
WorkflowStubare useful because they are type safe and allow you to invoke your Workflow methods such as@WorkflowMethod,@QueryMethod, and@SignalMethoddirectly. - An untyped
WorkflowStubdoes not use the Workflow interface, and is not type safe. It is more flexible because it has methods from theWorkflowStubinterface, such asstart,signalWithStart,getResults(sync and async),query,signal,cancelandterminate. Note that the Temporal Java SDK also provides typedWorkflowStubversions for these methods. When using untypedWorkflowStub, we rely on the Workflow Type, Activity Type, Child Workflow Type, as well as Query and Signal names. For details, see Temporal Client.
A Workflow Execution can be started either synchronously or asynchronously.
-
Synchronous invocation starts a Workflow and then waits for its completion. If the process that started the Workflow crashes or stops waiting, the Workflow continues executing. Because Workflows are potentially long-running, and Client crashes happen, it is not very commonly found in production use. The following example is a type-safe approach for starting a Workflow Execution synchronously.
  NotifyUserAccounts workflow = client.newWorkflowStub(
        NotifyUserAccounts.class,
        WorkflowOptions.newBuilder()
                .setWorkflowId("notifyAccounts")
                .setTaskQueue(taskQueue)
                .build()
        );

// start the Workflow and wait for a result.
  workflow.notify(new String[] { "Account1", "Account2", "Account3", "Account4", "Account5",
                "Account6", "Account7", "Account8", "Account9", "Account10"});
    }
// notify(String[] accountIds) is a Workflow method defined in the Workflow Definition. -
Asynchronous start initiates a Workflow Execution and immediately returns to the caller. This is the most common way to start Workflows in production code. The
WorkflowClientprovides some static methods, such asstart,execute,signalWithStartetc., that help with starting your Workflows asynchronously.The following examples show how to start Workflow Executions asynchronously, with either typed or untyped
WorkflowStub.-
Typed WorkflowStub Example
// create typed Workflow stub
FileProcessingWorkflow workflow = client.newWorkflowStub(FileProcessingWorkflow.class,
      WorkflowOptions.newBuilder()
              .setTaskQueue(taskQueue)
              .setWorkflowId(workflowId)
              .build());
// use WorkflowClient.execute to return future that contains Workflow result or failure, or
// use WorkflowClient.start to return WorkflowId and RunId of the started Workflow).
WorkflowClient.start(workflow::greetCustomer); -
Untyped WorkflowStub Example
WorkflowStub untyped = client.newUntypedWorkflowStub("FileProcessingWorkflow",
      WorkflowOptions.newBuilder()
              .setWorkflowId(workflowId)
              .setTaskQueue(taskQueue)
              .build());

// blocks until Workflow Execution has been started (not until it completes)
untyped.start(argument);
-
You can call a Dynamic Workflow implementation using an untyped WorkflowStub.
The following example shows how to call the Dynamic Workflow implementation in the Client code.
    WorkflowClient client = WorkflowClient.newInstance(service);
    /**
      * Note that for this part of the client code, the dynamic Workflow implementation must
      * be known to the Worker at runtime in order to dispatch Workflow tasks, and may be defined
      * in the Worker definition as:*/
    // worker.registerWorkflowImplementationTypes(DynamicGreetingWorkflowImpl.class);

    /* Create the Workflow stub to call the dynamic Workflow.
    * Note that the Workflow Type is not explicitly registered with the Worker.*/
    WorkflowOptions workflowOptions =
        WorkflowOptions.newBuilder().setTaskQueue(TASK_QUEUE).setWorkflowId(WORKFLOW_ID).build();
    WorkflowStub workflow = client.newUntypedWorkflowStub("DynamicWF", workflowOptions);
DynamicWorkflow can be used to invoke different Workflow Types.
To check what type is running when your Dynamic Workflow execute method runs, use getWorkflowType() in the implementation code.
String type = Workflow.getInfo().getWorkflowType();
See Workflow Execution Result for details on how to get the results of the Workflow Execution.
Using ExternalWorkflowStub
Use ExternalWorkflowStub within a Workflow to invoke, and send Signals to, other Workflows by type.
This helps particularly for executing Workflows written in other language SDKs, as shown in the following example.
@Override
  public String yourWFMethod(String name) {
      ExternalWorkflowStub callOtherWorkflow = Workflow.newUntypedExternalWorkflowStub("OtherWFId");
    }
See the Temporal Polyglot code for examples of executing Workflows written in other language SDKs.
Recurring start
You can start a Workflow Execution on a regular schedule by using setCronSchedule Workflow option in the Client code.
How to set a Workflow's Task Queue
In most SDKs, the only Workflow Option that must be set is the name of the Task Queue.
For your code to execute, a Worker Process must be running. This process needs a Worker Entity that is polling the same Task Queue name.
Set the Workflow Task Queue with the WorkflowStub instance in the Client code using WorkflowOptions.Builder.setTaskQueue.
- Type:
String - Default: none
//create Workflow stub for YourWorkflowInterface
YourWorkflowInterface workflow1 =
    WorkerGreet.greetclient.newWorkflowStub(
        GreetWorkflowInterface.class,
        WorkflowOptions.newBuilder()
                .setWorkflowId("YourWF")
                // Set the Task Queue
                .setTaskQueue(WorkerGreet.TASK_QUEUE)
                .build());
How to set a Workflow Id
Although it is not required, we recommend providing your own Workflow Idthat maps to a business process or business entity identifier, such as an order identifier or customer identifier.
Set the Workflow Id with the WorkflowStub instance in the Client code using WorkflowOptions.Builder.setWorkflowId.
- Type:
String - Default: none
//create Workflow stub for YourWorkflowInterface
YourWorkflowInterface workflow1 =
    WorkerGreet.greetclient.newWorkflowStub(
        GreetWorkflowInterface.class,
        WorkflowOptions.newBuilder()
                // Set the Workflow Id
                .setWorkflowId("YourWF")
                .setTaskQueue(WorkerGreet.TASK_QUEUE)
                .build());
Java WorkflowOptions reference
Create a newWorkflowStub in the Temporal Client code, call the instance of the Workflow, and set the Workflow options with the WorkflowOptions.Builder class.
The following fields are available:
| Option | Required | Type |
|---|---|---|
WorkflowId | No (but recommended) | String |
TaskQueue | Yes | String |
WorkflowExecutionTimeout | No | Duration |
WorkflowRunTimeout | No | Duration |
WorkflowTaskTimeout | No | Duration |
WorkflowIdReusePolicy | No | WorkflowIdReusePolicy |
RetryOptions | No | RetryOptions |
CronSchedule | No | String |
Memo | No | string |
SearchAttributes | No | Map<String, Object> |
WorkflowId
Set the Workflow Id with the WorkflowStub instance in the Client code using WorkflowOptions.Builder.setWorkflowId.
- Type:
String - Default: none
//create Workflow stub for YourWorkflowInterface
YourWorkflowInterface workflow1 =
    WorkerGreet.greetclient.newWorkflowStub(
        GreetWorkflowInterface.class,
        WorkflowOptions.newBuilder()
                // Set the Workflow Id
                .setWorkflowId("YourWF")
                .setTaskQueue(WorkerGreet.TASK_QUEUE)
                .build());
TaskQueue
Set the Workflow Task Queue with the WorkflowStub instance in the Client code using WorkflowOptions.Builder.setTaskQueue.
- Type:
String - Default: none
//create Workflow stub for YourWorkflowInterface
YourWorkflowInterface workflow1 =
    WorkerGreet.greetclient.newWorkflowStub(
        GreetWorkflowInterface.class,
        WorkflowOptions.newBuilder()
                .setWorkflowId("YourWF")
                // Set the Task Queue
                .setTaskQueue(WorkerGreet.TASK_QUEUE)
                .build());
WorkflowExecutionTimeout
Set the Workflow Execution Timeout with the WorkflowStub instance in the Client code using WorkflowOptions.Builder.setWorkflowExecutionTimeout.
- Type:
Duration - Default: Unlimited
//create Workflow stub for YourWorkflowInterface
YourWorkflowInterface workflow1 =
    WorkerGreet.greetclient.newWorkflowStub(
        GreetWorkflowInterface.class,
        WorkflowOptions.newBuilder()
                .setWorkflowId("YourWF")
                .setTaskQueue(WorkerGreet.TASK_QUEUE)
                // Set Workflow Execution Timeout duration
                .setWorkflowExecutionTimeout(Duration.ofSeconds(10))
                .build());
WorkflowRunTimeout
Set the Workflow Run Timeout with the WorkflowStub instance in the Client code using WorkflowOptions.Builder.setWorkflowRunTimeout.
- Type:
Duration - Default: Same as WorkflowExecutionTimeout.
//create Workflow stub for YourWorkflowInterface
YourWorkflowInterface workflow1 =
    WorkerGreet.greetclient.newWorkflowStub(
        GreetWorkflowInterface.class,
        WorkflowOptions.newBuilder()
                .setWorkflowId("YourWF")
                .setTaskQueue(WorkerGreet.TASK_QUEUE)
                // Set Workflow Run Timeout duration
                .setWorkflowRunTimeout(Duration.ofSeconds(10))
                .build());
WorkflowTaskTimeout
Set the Workflow Task Timeout with the WorkflowStub instance in the Client code using WorkflowOptions.Builder.setWorkflowTaskTimeout.
- Type:
Duration - Default: 10 seconds.
- Values: Maximum accepted value is 60 seconds.
//create Workflow stub for YourWorkflowInterface
YourWorkflowInterface workflow1 =
    WorkerGreet.greetclient.newWorkflowStub(
        GreetWorkflowInterface.class,
        WorkflowOptions.newBuilder()
                .setWorkflowId("YourWF")
                .setTaskQueue(WorkerGreet.TASK_QUEUE)
                // Set Workflow Task Timeout duration
                .setWorkflowTaskTimeout(Duration.ofSeconds(10))
                .build());
WorkflowIDReusePolicy
- Type:
WorkflowIdReusePolicy - Default:
AllowDuplicate - Values:
enums.AllowDuplicateFailedOnly: The Workflow can start if the earlier Workflow Execution failed, Canceled, or Terminated.AllowDuplicate: The Workflow can start regardless of the earlier Execution's closure status.RejectDuplicate: The Workflow can not start if there is a earlier Run.
//create Workflow stub for GreetWorkflowInterface
GreetWorkflowInterface workflow1 =
    WorkerGreet.greetclient.newWorkflowStub(
        GreetWorkflowInterface.class,
        WorkflowOptions.newBuilder()
                .setWorkflowId("GreetWF")
                .setTaskQueue(WorkerGreet.TASK_QUEUE)
                // Set Workflow Id Reuse Policy
                .setWorkflowIdReusePolicy(
                        WorkflowIdReusePolicy.WORKFLOW_ID_REUSE_POLICY_REJECT_DUPLICATE)
                .build());
RetryOptions
To set a Workflow Retry Options in the WorkflowStub instance use WorkflowOptions.Builder.setWorkflowRetryOptions.
- Type:
RetryOptions - Default:
Nullwhich means no retries will be attempted.
//create Workflow stub for GreetWorkflowInterface
GreetWorkflowInterface workflow1 =
    WorkerGreet.greetclient.newWorkflowStub(
        GreetWorkflowInterface.class,
        WorkflowOptions.newBuilder()
                .setWorkflowId("GreetWF")
                .setTaskQueue(WorkerGreet.TASK_QUEUE)
                // Set Workflow Retry Options
                .setRetryOptions(RetryOptions.newBuilder()
                .build());
CronSchedule
A Temporal Cron Job is the series of Workflow Executions that occur when a Cron Schedule is provided in the call to spawn a Workflow Execution.
A Cron Schedule is provided as an option when the call to spawn a Workflow Execution is made.
Set the Cron Schedule with the WorkflowStub instance in the Client code using WorkflowOptions.Builder.setCronSchedule.
Setting setCronSchedule changes the Workflow Execution into a Temporal Cron Job.
The default timezone for a Cron is UTC.
- Type:
String - Default: None
//create Workflow stub for YourWorkflowInterface
YourWorkflowInterface workflow1 =
    YourWorker.yourclient.newWorkflowStub(
        YourWorkflowInterface.class,
        WorkflowOptions.newBuilder()
                .setWorkflowId("YourWF")
                .setTaskQueue(YourWorker.TASK_QUEUE)
                // Set Cron Schedule
                .setCronSchedule("* * * * *")
                .build());
For more details, see the HelloCron Sample.
Memo
- Type:
String - Default: None
//create Workflow stub for GreetWorkflowInterface
GreetWorkflowInterface workflow1 =
    WorkerGreet.greetclient.newWorkflowStub(
        GreetWorkflowInterface.class,
        WorkflowOptions.newBuilder()
                .setWorkflowId("GreetWF")
                .setTaskQueue(WorkerGreet.TASK_QUEUE)
                // Set Memo. You can set additional non-indexed info via Memo
                        .setMemo(ImmutableMap.of(
                                "memoKey", "memoValue"
                        ))
                .build());
SearchAttributes
Search Attributes are additional indexed information attributed to Workflow and used for search and visibility. These can be used in a query of List/Scan/Count Workflow APIs. The key and its value type must be registered on Temporal server side.
- Type:
Map<String, Object> - Default: None
private static void parentWorkflow() {
        ChildWorkflowOptions childworkflowOptions =
                ChildWorkflowOptions.newBuilder()
                        // Set Search Attributes
                        .setSearchAttributes(ImmutableMap.of("MySearchAttributeNAme", "value"))
                        .build();
The following Java types are supported:
- String
- Long, Integer, Short, Byte
- Boolean
- Double
- OffsetDateTime
- Collection of the types in this list.
How to get the result of a Workflow Execution in Java
If the call to start a Workflow Execution is successful, you will gain access to the Workflow Execution's Run Id.
The Workflow Id, Run Id, and Namespace may be used to uniquely identify a Workflow Execution in the system and get its result.
It's possible to both block progress on the result (synchronous execution) or get the result at some other point in time (asynchronous execution).
In the Temporal Platform, it's also acceptable to use Queries as the preferred method for accessing the state and results of Workflow Executions.
A synchronous Workflow Execution blocks your client thread until the Workflow Execution completes (or fails) and get the results (or error in case of failure).
The following example is a type-safe approach for getting the results of a synchronous Workflow Execution.
 FileProcessingWorkflow workflow = client.newWorkflowStub(
                FileProcessingWorkflow.class,
                WorkflowOptions.newBuilder()
                        .setWorkflowId(workflowId)
                        .setTaskQueue(taskQueue)
                        .build();

// start sync and wait for results (or failure)
String result = workflow.processfile(new Argument());
An asynchronous Workflow Execution immediately returns a value to the caller.
The following examples show how to get the results of a Workflow Execution through typed and untyped WorkflowStub.
-
Typed WorkflowStub Example
// create typed Workflow stub
FileProcessingWorkflow workflow = client.newWorkflowStub(FileProcessingWorkflow.class,
              WorkflowOptions.newBuilder()
                      .setTaskQueue(taskQueue)
                      .setWorkflowId(workflowId)
                      .build());
// use WorkflowClient.execute (if your Workflow takes in arguments) or WorkflowClient.start (for zero arguments)
WorkflowClient.start(workflow::greetCustomer); -
Untyped WorkflowStub Example
WorkflowStub untyped = client.newUntypedWorkflowStub("FileProcessingWorkflow",
                WorkflowOptions.newBuilder()
                        .setWorkflowId(workflowId)
                        .setTaskQueue(taskQueue)
                        .build());

// blocks until Workflow Execution has been started (not until it completes)
untyped.start(argument);
If you need to wait for a Workflow Execution to complete after an asynchronous start, the most straightforward way is to call the blocking Workflow instance again.
Note that if WorkflowOptions.WorkflowIdReusePolicy is not set to AllowDuplicate, then instead of throwing DuplicateWorkflowException, it reconnects to an existing Workflow and waits for its completion.
The following example shows how to do this from a different process than the one that started the Workflow Execution.
YourWorkflow workflow = client.newWorkflowStub(YourWorkflow.class, workflowId);

// Returns the result after waiting for the Workflow to complete.
String result = workflow.yourMethod();
Another way to connect to an existing Workflow and wait for its completion from another process, is to use UntypedWorkflowStub. For example:
WorkflowStub workflowStub = client.newUntypedWorkflowStub(workflowType, workflowOptions);

// Returns the result after waiting for the Workflow to complete.
String result = untyped.getResult(String.class);
Get last (successful) completion result
For a Temporal Cron Job, get the result of previous successful runs using GetLastCompletionResult().
The method returns null if there is no previous completion.
The following example shows how to implement this in a Workflow.
public String cronWorkflow() {
    String lastProcessedFileName = Workflow.getLastCompletionResult(String.class);

    // Process work starting from the lastProcessedFileName.
    // Business logic implementation goes here.
    // Updates lastProcessedFileName to the new value.

    return lastProcessedFileName;
}
Note that this works even if one of the Cron schedule runs failed. The next schedule will still get the last successful result if it ever successfully completed at least once. For example, for a daily cron Workflow, if the run succeeds on the first day and fails on the second day, then the third day run will get the result from first day's run using these APIs.